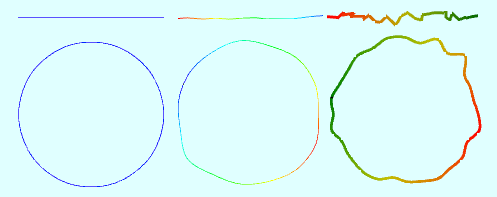
The three.js JavaScript library does not provide direct support for gradient colored lines. In this Part-2 of my Groot Clock articles I describe how I created the custom gradient lines and circle-lines used in the project.

As in the Part-1 article, I assume you have a basic familiarity with TypeScript, the three.js library and the set up of three.js programs.
Gradient Colored Line
Let’s start by creating a simple gradient colored three.js line. We will rely on WebGL to compute the color gradient of a line between its 2 end points (a.k.a. vertices).

To do this we use a BufferedGeometry into which we set the position and color of each end point. We do this by creating 2 BufferAttribute instances, one for the end point positions and one for the color of each end point. Next we create a simple LineBasicMaterial. We inform the material that the geometry will provide the color details for the end points. We complete the process by a new Line instance which is added to the scene for rendering.
// create geometry
 const geometry = new BufferGeometry();
 // create line end points and add to geometry
 const vertices = new Float32Array([
    0, 0, 0,
   50, 0, 0
 ]);
 geometry.addAttribute('position', new BufferAttribute(vertices,3));
 // create colors of each end point (vertex) and add to geometry
 const colors = new Float32Array([
   1.0, 0.0, 0.0,  // red (normalized)
   0.0, 1.0, 0.0   // green (normalized)
 ]);
 geometry.addAttribute('color', new BufferAttribute(colors,3));
 // create material
 const material = new LineBasicMaterial({
   vertexColors: VertexColors, // inform material that geometry
                               // will provide color info
   linewidth: 4                // lineWidth not universally supported
                               // works with safari
 });
 // create line and position it
 const line = new Line(geometry, material);
 line.computeLineDistances();
 // add line to scene so it can be rendered
 scene.add(line);
Multisegment Gradient Colored Lines
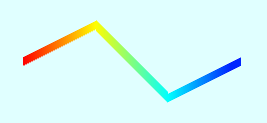
Creating a multi-segment gradient colored line is similar to creating a single segment line with the addition of internal vertices and their corresponding colors. Using a multisegment line you can create some neat line shapes. One requirement to note is that the geometry must have color data for each vertex.

// create geometry
const geometry = new BufferGeometry();

// create line end points and add to geometry
const vertices = new Float32Array([
   0,   0,  0,   // (0,0,0)
  20,  10,  0,   // (20,10,0)
  40, -10,  0,   // (40,-10,0)
  60,   0,  0    // (60,0,0)
 ]);
geometry.addAttribute('position', new BufferAttribute(vertices,3));

// create colors of each end point (vertex) and add to geometry
const colors = new Float32Array([
  1.0, 0.0, 0.0,  // red (normalized)
  1.0, 1.0, 0.0,  // yellow (normalized)
  0.0, 1.0, 1.0,  // purple (normalized)
  0.0, 0.0, 1.0,  // blue (normalized)
]);
geometry.addAttribute('color', new BufferAttribute(colors,3));

// create material
const material = new LineBasicMaterial({
  vertexColors: VertexColors, // inform material that geometry
                              // will provide color info
  linewidth: 4                // lineWidth not universally supported
                              // works with safari
});

// create line
const line = new Line(geometry, material);
line.computeLineDistances();

// add line to scene so it can be rendered
scene.add(line);
Gradient Colored CircleLine
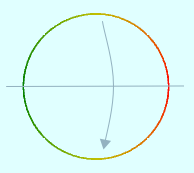
Drawing a gradient colored circle is a little more involved as three.js does not provide a wireframe circle. The approach I’ve used is to compute a series of evenly spaced vertices that lie on the circle perimeter and fit a line through each of them to form a CircleLine. Gradient coloring of a CircleLine involves shading 1/2 of the CircleLine with interpolated colors between the startColor and endColor. Then mirror each color value onto the other 1/2 of the CircleLine.

const radius = 20;
const segmentCount = 60
const segmentPoints = new Array<Vector3>();

// compute vertices on the perimeter of the circle
const SEG_RADS = 2 * Math.PI / segmentCount;
for (let i = 0; i < segmentCount; i++) {
  const x = radius * Math.cos(i * SEG_RADS);
  const y = radius * Math.sin(i * SEG_RADS);
  segmentPoints.push(new Vector3(x, y, 0));
}

// create a smooth closed spline
const stemCurve = new CatmullRomCurve3(segmentPoints, true);
const splinePoints = stemCurve.getPoints(360);

// create geometry using 360 points on the circle
const geometry = new BufferGeometry().setFromPoints(splinePoints);

// Need to create 1 gradient color for each vertex.
// Color gradient for circle starts and ends with the startColor.
// Compute gradient colors from startColor to endColor on 180 degress
// using linear interpolation.
// Then mirror colors on [0-180] degrees to [360-180] degrees
const startColor = new Color('red');
const endColor = new Color('green');

const vertCnt = geometry.getAttribute('position').count;
let hemisphereSegmentCount = Math.ceil(vertCnt / 2.0);
const lerpInc = 1.0 / hemisphereSegmentCount;

const colors = new Float32Array(vertCnt * 3);
for (let i = 0; i <= hemisphereSegmentCount; i++) {
  const lerpColor = new Color(startColor);
  lerpColor.lerpHSL(endColor, i * lerpInc);

  colors[i * 3] = lerpColor.r;
  colors[i * 3 + 1] = lerpColor.g;
  colors[i * 3 + 2] = lerpColor.b;
}

// gradient color computed for top half of circle.
// Now mirror top half colors onto bottom half of circle
for (let i = 1, j = (vertCnt - 1) * 3; i < j; i += 3, j -= 3) {
  colors[j] = colors[i];
  colors[j+1] = colors[i+1];
  colors[j+2] = colors[i+2]
}

geometry.addAttribute('color', new BufferAttribute(colors, 3));

// create material
const material = new LineBasicMaterial({
  vertexColors: VertexColors,
  linewidth: 2
});

// create line
const circle = new Line(geometry, material);
circle.computeLineDistances();

scene.add(circle);
In my Groot Clock project I have factored the code above into a utility class to simplify its use. You can find all of the code for the project here.
In Part-3, I’ll discuss animating the drawing of lines in three.js. In the meantime please consider following me on twitter. All comments, suggestions and retweets will be greatly appreciated.